Author Topic: Building a Better Boba: Greetings from Darklord  (Read 23884 times)

Offline Darklord1967

  • Roberto DARKLORD Williams
  • Ensign
  • *
  • Posts: 88
  • Feedback: +0/-0
  • Gender: Male
  • Peace, Love, Elegance, and Excellence to all!
Re: Building a Better Boba: Greetings from Darklord
« Reply #60 on: October 14, 2010, 04:33:52 PM »
I'm going to be a little cinical here...

The pockets, although a great idea, are kind of a waste of effort if you ask me.  It's hard to tell from the close up images but the new pockets look too bulbous and baggy as compared to the original molded on details.  To me, at that scale, having the shin tools molded on is not a problem because (as you found out) it would be almost impossible to make usable, posable, working tools to fit into the pockets and yet still be able to be held and "used" by the figure.

That being said, it is a realy coold idea, and you made something that almost full-fills the feature you wanted. And THAT is what we all strive for while customizing.

Remember, that all of this is being said by a guy who destroys two figures (sometimes more) only to be able to add one or two added points of articulation into a figure! 

I am definately still impressed with this project.  I can't wait to see the final result of all your hard work.


Believe it or not, I kinda agree with you  here.

I will point out that the pockets really look more bulbous in photos than they do in person.

Nevertheless, I actually went in yesterday and removed the pockets and trimmed them down CONSIDERABLY.

They are now much more flush against the figure's shins and look amazing.  In the next full body shot of the figure, you will see what I mean.

Still no actual full tools in the pockets (only the exposed tops).  But the "tools" are still clearly emerging as separate pieces out of those pockets.  In the final analysis that is really want I wanted to achieve to get away from that molded look.

Offline trooperfelks

  • Commander
  • *
  • Posts: 445
  • Feedback: +8/-0
  • Gender: Male
Re: Building a Better Boba: Greetings from Darklord
« Reply #61 on: October 14, 2010, 05:23:51 PM »
wow great job . looks alote better that way cant wait to see it done . Im new to this site as well . welcome
One shall stand < one shall fall

Offline spudafett

  • Mando Master
  • Moff
  • *
  • Posts: 3570
  • Feedback: +7/-0
  • Gender: Male
  • He's no good to me mashed!
    • deviant art
Re: Building a Better Boba: Greetings from Darklord
« Reply #62 on: October 15, 2010, 06:27:34 PM »
I'm going to be a little cinical here...
The pockets, although a great idea, are kind of a waste of effort if you ask me.  It's hard to tell from the close up images but the new pockets look too bulbous and baggy as compared to the original molded on details.  To me, at that scale, having the shin tools molded on is not a problem because (as you found out) it would be almost impossible to make usable, posable, working tools to fit into the pockets and yet still be able to be held and "used" by the figure.
That being said, it is a realy coold idea, and you made something that almost full-fills the feature you wanted. And THAT is what we all strive for while customizing.
Remember, that all of this is being said by a guy who destroys two figures (sometimes more) only to be able to add one or two added points of articulation into a figure! 
I am definately still impressed with this project.  I can't wait to see the final result of all your hard work.


Believe it or not, I kinda agree with you  here.

I will point out that the pockets really look more bulbous in photos than they do in person.

Nevertheless, I actually went in yesterday and removed the pockets and trimmed them down CONSIDERABLY.

They are now much more flush against the figure's shins and look amazing.  In the next full body shot of the figure, you will see what I mean.

Still no actual full tools in the pockets (only the exposed tops).  But the "tools" are still clearly emerging as separate pieces out of those pockets.  In the final analysis that is really want I wanted to achieve to get away from that molded look.

great!  I can't wait to see the final product of this project.  I'm thinking about trying the cloth armor mount myself on a future project.  where did you get the glue you are using for the cloth?   

Offline Darklord1967

  • Roberto DARKLORD Williams
  • Ensign
  • *
  • Posts: 88
  • Feedback: +0/-0
  • Gender: Male
  • Peace, Love, Elegance, and Excellence to all!
Re: Building a Better Boba: Greetings from Darklord
« Reply #63 on: October 16, 2010, 01:04:48 AM »

The glue I use for fabric can be found at virtually ANY hardware store, arts and crafts store, office supply, or even the school supply section in a department store.  I use 3M Spray Mount Adhesive.  This glue is deigned to be used on virtually ANY surfaces that you wish to join.

Naturally when making something as small and precise as an action figure's garment, you will not be working with the glue in its spray form.  I like to use a piece of old cardboard where I'll spray some of the glue onto (like a pallate). Then I'll use an old worn small paint brush to dip into the glue, and apply in a controlled way to the small part I am creating.

SPECIAL NOTE  When working with this glue to bond fabrics, allow the glue to become a little tacky first.  If the fabric is being joined to another surface of another material (like say, custom Boba's vest being permanently glued to the action figure's plastic torso), then apply the slightly tacky glue to the other surface , and NOT directly to the fabric itself.

The reason for this rule of thumb is to avoid the glue's seepage through your cloth.  If the glue is too wet when you use it, (especially when bonding fabric to fabric, and you have no choice but to apply directly to the fabric's back), there will be an unsightly seepage stain visible right through the fabric.

Offline spudafett

  • Mando Master
  • Moff
  • *
  • Posts: 3570
  • Feedback: +7/-0
  • Gender: Male
  • He's no good to me mashed!
    • deviant art
Re: Building a Better Boba: Greetings from Darklord
« Reply #64 on: October 16, 2010, 04:47:43 AM »
Thanks for the tip!  I've been experimenting a little bit with soft goods and cloth accessories a little lately and I've been using super glue to bond them together and that anoying seeping problem has been killing me! 
Does this glue your using cause the fabric to become stiff? or does it remain pretty flexible?

Offline Commander_Kurgan

  • Brigadier
  • *
  • Posts: 1156
  • Feedback: +8/-0
  • Gender: Male
    • Kurgan's Star Wars Customs
Re: Building a Better Boba: Greetings from Darklord
« Reply #65 on: October 16, 2010, 02:16:31 PM »
Shab, this is the most detailed Boba I've seen so far.
Absolutely great work!
Kurgan's Showcase: http://kurganscustoms.blogspot.com

People sleep peaceably in their beds at night only because rough men stand ready to do violence on their behalf

Offline Darklord1967

  • Roberto DARKLORD Williams
  • Ensign
  • *
  • Posts: 88
  • Feedback: +0/-0
  • Gender: Male
  • Peace, Love, Elegance, and Excellence to all!
Re: Building a Better Boba: Greetings from Darklord
« Reply #66 on: October 16, 2010, 02:57:11 PM »
Thanks for the tip!  I've been experimenting a little bit with soft goods and cloth accessories a little lately and I've been using super glue to bond them together and that anoying seeping problem has been killing me! 
Does this glue your using cause the fabric to become stiff? or does it remain pretty flexible?

That's the nice part!  Once dry, The glue does not make the fabric hard!  It will remain flexible! ;D

Offline Darklord1967

  • Roberto DARKLORD Williams
  • Ensign
  • *
  • Posts: 88
  • Feedback: +0/-0
  • Gender: Male
  • Peace, Love, Elegance, and Excellence to all!
Re: Building a Better Boba: Greetings from Darklord
« Reply #67 on: October 21, 2010, 06:00:33 PM »
HELMET DETAILING

Sometimes the fine detail phase is fun.  And sometimes it is NOT.

Tonight, it was definitely NOT fun!

I worked to finalize the final details of Boba Fett’s helmet  and it was truly a tedious experience.

Using strip styrene, I re-created the raised ridge details at the back of the helmet  (which were lost during the cranial enlargement operation I performed three weeks ago).


I carefully measured the required size of the raised ridge and began assembling it off of the helmet.  I made 45 degree angled miter cuts at the corners to form the right angles on this raised detail.


Let’s just say that when the strips are this small, performing this operation accurately requires more that a few attempts.

When the square ridge detail had fully set, I painted it in the correct dull red.


While I waited for the paint to dry, I painted the rear bottom half of the helmet in dark green.

Using superglue, I carefully attached the assembled, painted ridge to the rear of the helmet.


I next turned my attention to the helmet’s rangefinder.

I really felt like I needed to correct the rubbery, overly thick rod of the rangefinder into something that was thinner and cleaner.


I actually used a single staple from a grapple gun, straightened it, and attached the rangefinder tip.  I was very pleased with its overall  slender metallic look once it was attached to the helmet.


Offline Darklord1967

  • Roberto DARKLORD Williams
  • Ensign
  • *
  • Posts: 88
  • Feedback: +0/-0
  • Gender: Male
  • Peace, Love, Elegance, and Excellence to all!
Re: Building a Better Boba: Greetings from Darklord
« Reply #68 on: October 21, 2010, 06:12:23 PM »
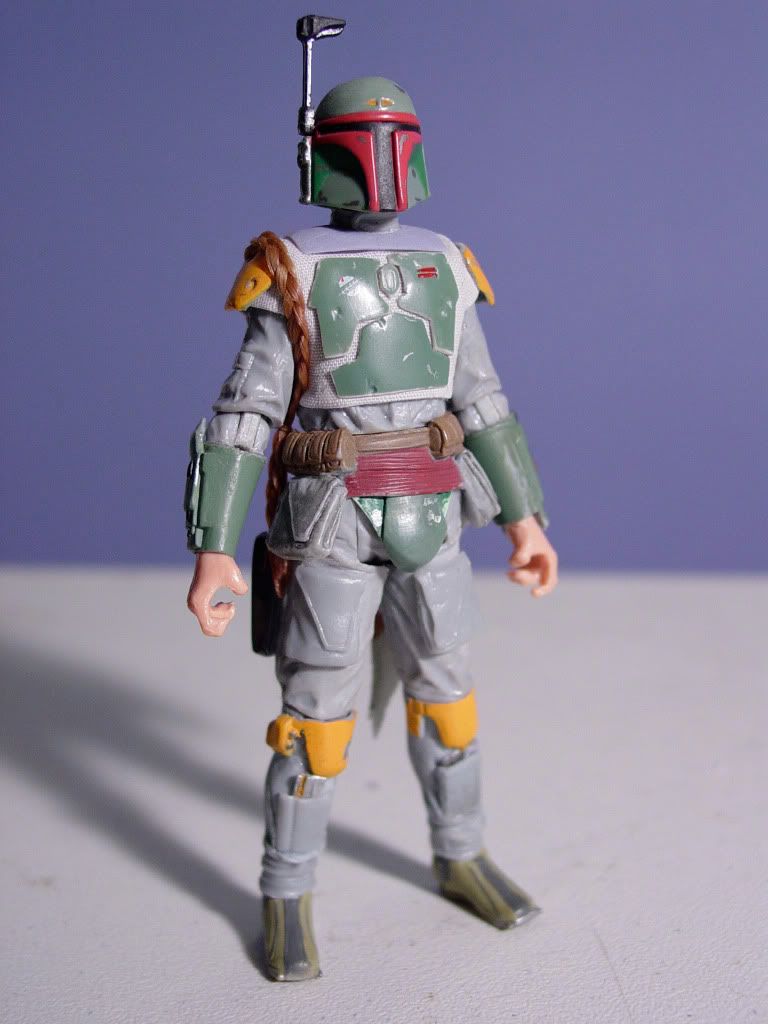
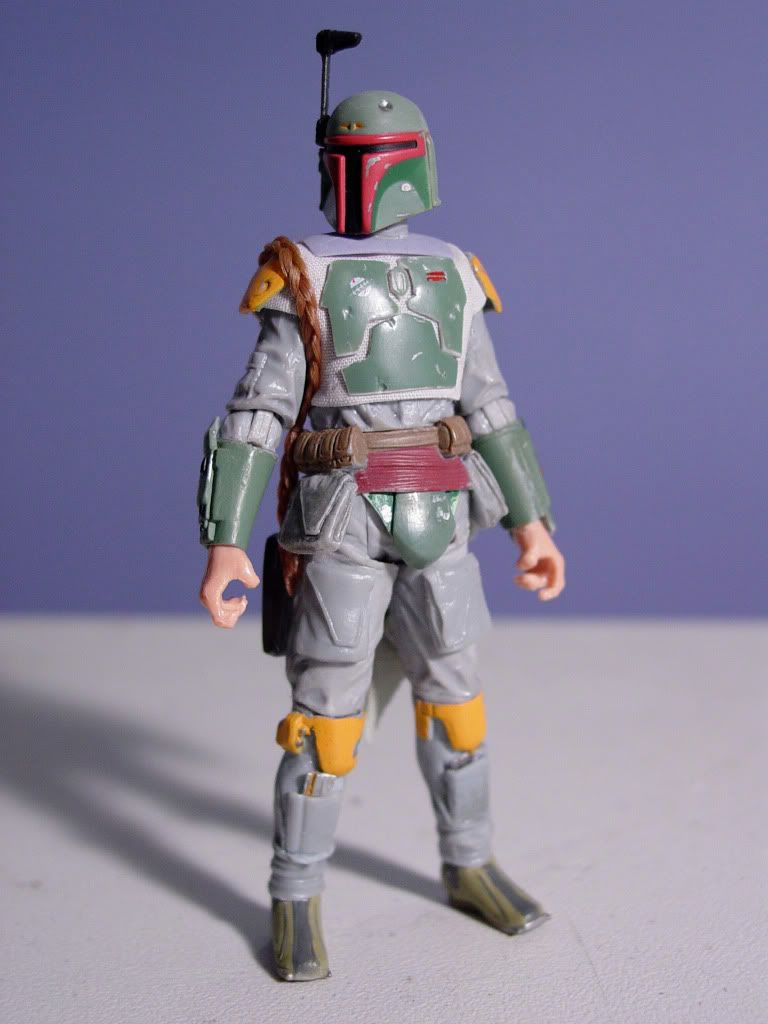
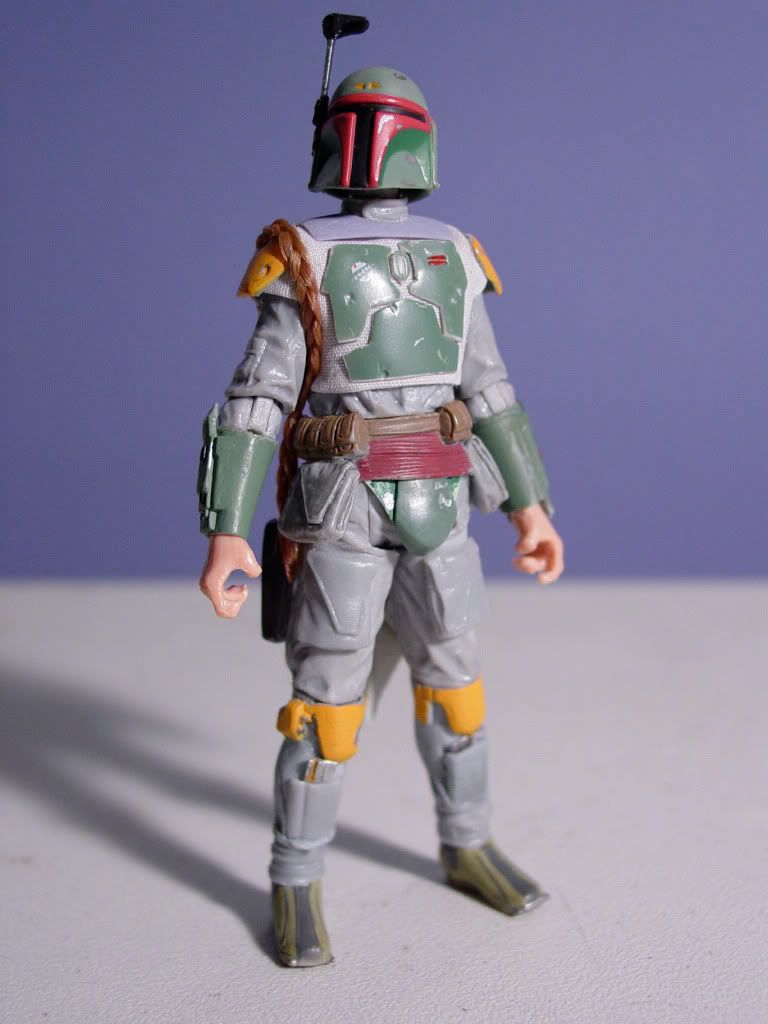
Alright, some PM'ed requests have come in for some up to date photos of the custom Boba Fett figure in it's current state.  It's also been requested to make the photos a bit less "shadowy" so that all details of the figure are visible.

Well here are some new photos more frontally lit.


Since the last time a full body shot of the figure was taken, I added:

1)  The Working Shin Pockets with separate Shin tools (veneers) to get away from the standard production figure's molded look.  The pockets have since been made even MORE flush again the figure's shins (they were a bit too bulky before / Now they are correct).  NOTE: Looking at these new photos, I am SOOOOO glad that I went to the trouble of creating these pockets and tools veneers. To my eyes they make such a huge difference in the final look of the figure when compared  to the molded pocket/shins look.

2) The stalk for the helmet's rangefinder has been made much stronger, straighter, slimmer, and sturdier (with the use of a grapple gun staple)

3) The rear of the helmet has had the ridge details finalized (not visible from these photos).
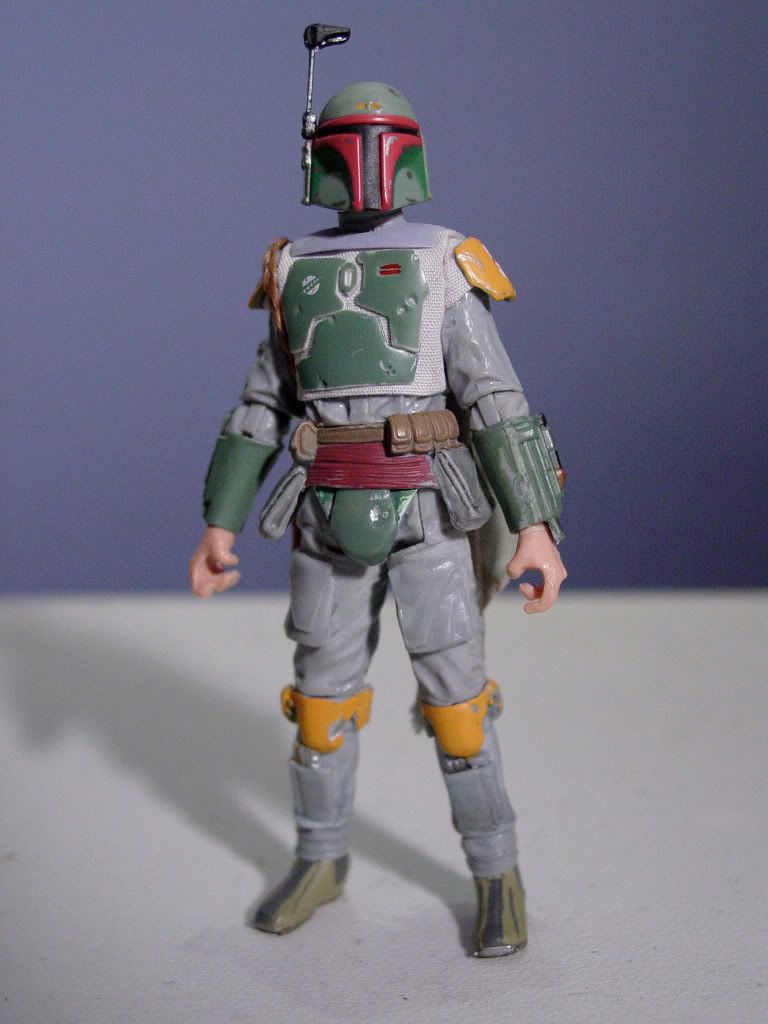


DEATILS STILL PENDING:

1)  All pieces of armor (crotch, torso plates, backpack mount, collar armor)  painted (if needed) and final glue.

2)  Fastening straps added to the the backs of armored knee pads, and to the underside of crotch armor.

3)  Final gloved hands painted and the raised white details added to the backs of both hands

4)  Bicep sleeve cuffs sculpted to both upper arms

5) Power feed tube added to right arm wrist weapon gauntlet.

6)  Final decal graphics added to back rocketpack

7)  Tiny fastening studs added to collar armor shoulder seams.  Aperature drilled into collar armor for side cape fastening.

8)  Correct color wookie braids (3 strands) added and bundled with correct red and black bands.

9)  Flack vest turtle neck created in fabric to match the rest of the garment.

10) Touch ups on paint rubs on the utility belt and left hand wrist gauntlet weapon.

11)  Darkening right shoulder bell into (correct) deep orange (while left shoulder bell stays the current (correct) yellow.

12)  Performing silver paint touch ups on steel toe spikes and steel fastening studs on sides on armored knee pads.

13)  Lastly,  Laser rifle updated into correct configuration to match prop as seen in film.
« Last Edit: October 21, 2010, 06:25:04 PM by Darklord1967 »

Offline CaptainLux

  • "Get the order and execute it. Let the generals sort out the rest." -CC-5052
  • Fleet Admiral
  • *
  • Posts: 2774
  • Feedback: +0/-0
  • Gender: Male
  • Captain Lux 327th Star Corps
Re: Building a Better Boba: Greetings from Darklord
« Reply #69 on: October 21, 2010, 06:26:03 PM »
I love this Boba man!!!!!!!!!!!!!!!!!!!!
 :o :o :o :o :o :o :o :o


Offline CloneSniper78

  • Admiral
  • *
  • Posts: 2274
  • Feedback: +13/-0
  • Gender: Male
  • I'm just a simple man trying to make his way in th
    • www.youtube.com
Re: Building a Better Boba: Greetings from Darklord
« Reply #70 on: October 21, 2010, 07:20:36 PM »
I can't wait to see the rifle and wookie braids!

Offline Jedi Minstrel

  • Marshal
  • *
  • Posts: 1664
  • Feedback: +0/-0
  • Gender: Male
Re: Building a Better Boba: Greetings from Darklord
« Reply #71 on: October 21, 2010, 07:48:49 PM »
Holy Wow!  I feel unworthy.

Offline Art deWhill

  • Marshal
  • *
  • Posts: 1662
  • Feedback: +0/-0
  • Gender: Male
  • I am making this up as I go.
    • Art deWhill's Canvas
Re: Building a Better Boba: Greetings from Darklord
« Reply #72 on: October 21, 2010, 10:03:24 PM »
simply terrific!!
you are doing a unbelievalble job, I would only glue all parts to my fingers...
most excellent, he is not just a better Boba, he is the BEST  :o

Offline Commander_Kurgan

  • Brigadier
  • *
  • Posts: 1156
  • Feedback: +8/-0
  • Gender: Male
    • Kurgan's Star Wars Customs
Re: Building a Better Boba: Greetings from Darklord
« Reply #73 on: October 21, 2010, 10:33:10 PM »
Damn, this is awesome.
Kurgan's Showcase: http://kurganscustoms.blogspot.com

People sleep peaceably in their beds at night only because rough men stand ready to do violence on their behalf

Offline wraithnine

  • Grand Moff
  • *
  • Posts: 4969
  • Feedback: +39/-0
  • Gender: Male
  • Hasbro , putting the "FU" in fun
    • my youtube channel
Re: Building a Better Boba: Greetings from Darklord
« Reply #74 on: October 22, 2010, 02:23:33 AM »
bloody hell!   you make the rest of us look like rank amatuers!
R.I.P. The Clone Wars line ..Hasbro you are ..idiots
good riddance to Movie Heroes...
http://www.facebook.com/WraithnineCustoms